

Complete DIY wooden coffee table plans with step-by-step instructions, material lists, and pro tips. Build a stunning custom table for under $100 — beginner-friendly guide included.
Estimated Reading Time: 12 minutes
Picture this: You’re scrolling through furniture websites, looking at coffee tables that cost $400, $600, even $800 for something that looks like it came from a factory assembly line. Meanwhile, that space in your living room keeps staring back at you, practically begging for something with character, something that tells your story.
I’ve been there. Three years ago, I was a complete woodworking novice who couldn’t tell a mortise from a tenon. Today, I’ve built over 30 custom pieces, and I’m about to share the exact plans and techniques that transformed my living space — and my confidence with power tools. The best part? You can build a stunning wooden coffee table for under $100 and probably finish it in a single weekend.

Whether you’re working with basic hand tools in a tiny apartment or have access to a full workshop, these plans will get you there. I’ve designed them specifically for beginners while including advanced techniques for those ready to level up their craftsmanship.
Table of Contents
- Why Build Your Coffee Table?
- Essential Tools and Materials
- Choosing the Right Wood
- 5 Proven Coffee Table Designs
- Step-by-Step Building Process
- Advanced Joinery Techniques
- Finishing Touches That Make the Difference
- Common Mistakes (And How to Avoid Them)
- Design Comparison: Which Style Fits Your Space?
- Troubleshooting Your Build
- Maintenance and Long-term Care
Why Build Your Coffee Table?
Here’s something furniture stores don’t want you to know: most mass-produced coffee tables are built with particleboard, cheap veneers, and joints that’ll wobble within six months. When you build your wooden coffee table, you’re not just saving money — you’re creating something that’ll outlast anything you can buy at a big box store.
I learned this the hard way when my $300 “solid wood” coffee table started sagging in the middle after just eight months. The frustration of that experience led me to my first DIY build, and I haven’t looked back since.
The real benefits go beyond durability:
- Customization: Perfect dimensions for your specific space and needs
- Wood selection: Choose genuine hardwoods instead of composite materials
- Skill development: Each project builds confidence for future builds
- Cost savings: Quality materials for 70–80% less than retail prices
- Personal satisfaction: Nothing beats the pride of pointing to something and saying, “I made that.”
Building your coffee table also gives you complete control over the environmental impact. You can source reclaimed wood, choose sustainable lumber, or even repurpose materials from previous projects. I’ve built beautiful tables from old fence posts, reclaimed barn wood, and even shipping pallets (though I’ll explain why pallets require extra caution).
The time investment is surprisingly manageable. Most beginners complete their first coffee table in 8–12 hours of actual work time, spread across 2–3 days to allow for drying time between steps. Compare that to the weeks you might spend hunting for the “perfect” store-bought table that checks all your boxes.
Essential Tools and Materials
Let me be straight with you about tools — you don’t need a $10,000 workshop to build furniture. I built my first three coffee tables with less than $200 worth of tools, many borrowed from neighbors. Here’s what you need versus what’s nice to have.
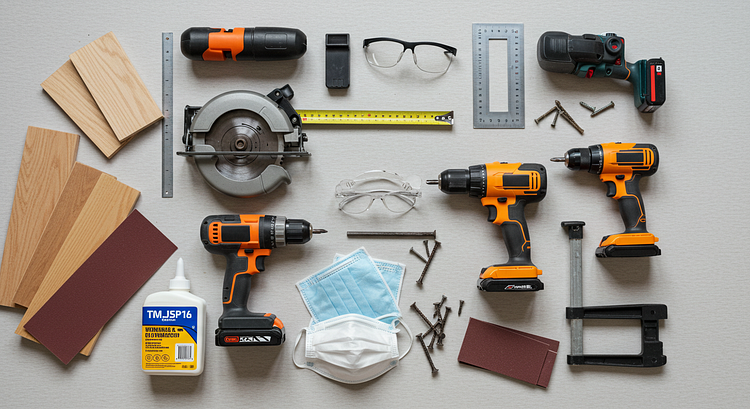
Essential Tools:
- Circular saw or miter saw (you can have lumber cut at most home centers)
- Drill/driver with bits
- Random orbital sander or sanding blocks
- Tape measure and pencil
- Speed square
- Clamps (at least 4 pipe clamps or bar clamps)
- Safety glasses and a dust mask
Tools That Make Life Easier:
- Table saw (dramatically improves cut quality and speed)
- Router for edge profiles
- Pocket hole jig for strong, hidden joints
- Brad nailer for temporary holding and trim work
Material Selection Strategy:
The wood you choose will make or break your project, both aesthetically and structurally. I’ve experimented with everything from pine to exotic hardwoods, and here’s what I’ve learned works best for coffee tables.
For beginners, I always recommend starting with construction-grade Douglas fir or Southern yellow pine. These softwoods are forgiving to work with, readily available, and surprisingly beautiful when properly finished. A standard coffee table requires about 25–30 board feet, which typically costs $40–60.
Pine Benefits:
- Easy to cut and sand
- Takes stain beautifully
- Lightweight but strong enough for coffee table use
- Forgiveness of minor mistakes
Hardwood Upgrades: If you’re feeling ambitious or want an heirloom piece, consider red oak, white oak, or maple. These add 50–100% to material costs but create tables that’ll last generations. Oak has beautiful grain patterns and incredible strength, while maple offers a clean, modern look that takes any finish beautifully.
I made the mistake early on of buying “cheap” wood that was more expensive in the long run. Warped boards, excessive knots, and poor grain patterns led to frustration and wasted time. Invest in properly dried, straight lumber from the start.
Shopping List for Basic Coffee Table (36" x 18" x 16" high):
- 4 pieces 2x4x8 (legs and supports)
- 3 pieces 1x6x8 (tabletop)
- 1 piece 1x4x8 (lower shelf, optional)
- Wood glue
- 2.5" wood screws
- 1.25" wood screws
- Sandpaper (120, 150, 220 grit)
- Wood stain or paint
- Polyurethane finish
Choosing the Right Wood
The species you select will determine not just the appearance of your coffee table, but also how it behaves during construction and over the years of use. I’ve worked with dozens of different woods, and each has taught me something new about grain patterns, workability, and long-term durability.
Understanding Wood Movement: Here’s something most DIY guides skip — wood is a living material that expands and contracts with humidity changes throughout the year. I learned this lesson when my first oak coffee table developed a crack down the middle during a particularly dry winter. Understanding wood movement isn’t complicated, but it’s crucial for long-lasting results.
Softwoods like pine move less than hardwoods, making them more forgiving for beginners. If you choose hardwood, plan your grain direction carefully and avoid constraining the wood’s natural movement with your joinery choices.
My Top Wood Recommendations by Skill Level:
Beginner-Friendly Options:
- Construction Pine: Readily available, affordable, easy to work with
- Poplar: Takes paint beautifully, minimal grain variation
- Cedar: Naturally rot-resistant, lovely aroma, lightweight
Intermediate Choices:
- Red Oak: Classic furniture wood with gorgeous grain
- Maple: Hard, durable, takes any finish
- Cherry: Ages beautifully, premium appearance
Advanced Selection:
- Walnut: Rich chocolate tones, premium hardwood
- White Oak: Extremely durable, water-resistant
- Ash: Strong and flexible, unique grain patterns
Reclaimed Wood Considerations: Reclaimed lumber adds incredible character but requires extra attention. I’ve built stunning tables from old barn beams and fence posts, but always check for:
- Hidden nails or metal (use a metal detector)
- Chemical treatments (avoid railroad ties and treated lumber)
- Insect damage (look for small holes)
- Structural soundness (avoid pieces with extensive checking)
The patina and history of reclaimed wood can’t be replicated, but budget extra time for preparation and potential surprises during the build process.
5 Proven Coffee Table Designs
After building dozens of coffee tables, I’ve identified five designs that consistently deliver professional results while remaining accessible to beginners. Each style serves different living situations and skill levels.
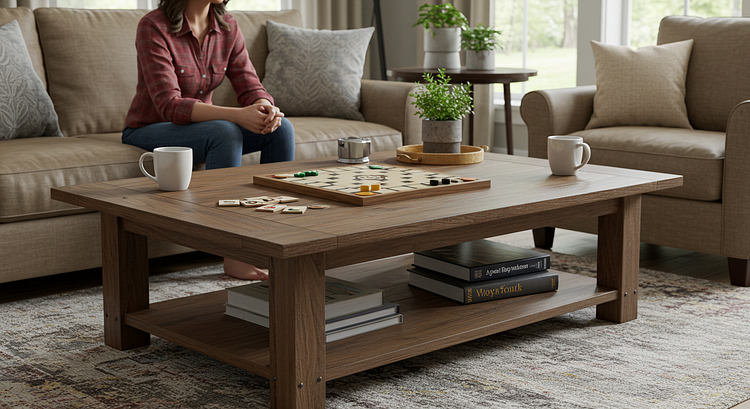
1. The Classic Farmhouse Table
This design launched my woodworking journey and remains my most-requested build. The farmhouse style combines rustic charm with practical functionality, featuring a thick plank top and sturdy X-braced base.
Key Features:
- Dimensions: 48" x 24" x 18" high
- Materials: Pine or fir construction
- Joinery: Pocket screws and wood glue
- Difficulty: Beginner
- Build time: 6–8 hours
The beauty of farmhouse style lies in its imperfections. Slight variations in board width, visible wood grain, and hand-sanded edges all contribute to the authentic, lived-in feel. I’ve built these tables from $60 worth of materials that rival $500 store-bought pieces.
2. Modern Minimalist Design
Clean lines and hidden joinery define this contemporary approach. I developed this design for a client who wanted something that wouldn’t compete with their mid-century modern furniture.
Key Features:
- Dimensions: 42" x 20" x 16" high
- Materials: Maple or birch plywood with solid wood edges
- Joinery: Mortise and tenon, hidden fasteners
- Difficulty: Intermediate
- Build time: 10–12 hours
The challenge with minimalist design is that every detail matters. Imperfections that add character to farmhouse pieces become glaring flaws in modern furniture. This design teaches precision and patience but creates a stunning centerpiece.
3. Industrial Pipe Base Table
Combining wood and metal creates visual interest while simplifying the joinery requirements. This design works particularly well in loft-style spaces or as a complement to existing industrial elements.
Key Features:
- Dimensions: 36" x 18" x 17" high
- Materials: Reclaimed wood top, black iron pipe base
- Joinery: Threaded pipe connections, screws to attach top
- Difficulty: Beginner
- Build time: 4–6 hours
The pipe base eliminates complex woodworking joints while providing exceptional stability. I source my pipe fittings from plumbing supply stores rather than big box retailers — the quality difference is significant and the cost is often lower.
4. Storage-Integrated Design
Every small space benefits from hidden storage, and coffee tables offer prime real estate for tucking away remotes, magazines, and living room essentials.
Key Features:
- Dimensions: 40" x 22" x 18" high
- Materials: Plywood construction with solid wood facing
- Joinery: Dado joints for shelves, concealed hinges for access panels
- Difficulty: Intermediate
- Build time: 12–15 hours
This design taught me the importance of planning the internal structure before cutting external pieces. The storage compartments require precise measurements and careful consideration of access methods.
5. Live Edge Natural Beauty
Working with live-edge slabs connects you directly to the tree’s natural form. These pieces celebrate the wood’s original character while creating truly one-of-a-kind furniture.
Key Features:
- Dimensions: Varies with slab (typically 30–50" long)
- Materials: Live edge hardwood slab, steel hairpin legs
- Joinery: Minimal — legs attach with threaded inserts
- Difficulty: Beginner to intermediate (depending on slab preparation needed)
- Build time: 8–10 hours
Live edge work focuses more on material preparation than complex joinery. The key skills involve flattening, sanding, and finishing techniques that highlight the wood’s natural beauty.
Step-by-Step Building Process
Let me walk you through building the Classic Farmhouse table — it’s the perfect introduction to furniture making and incorporates techniques you’ll use in every future project. I’ll share the exact process I use, including the mistakes I made early on, so you can avoid them.
Phase 1: Planning and Preparation (30 minutes)
Before touching any wood, I spend time with my plans and materials. This isn’t just about measurements — it’s about visualizing the entire build process and identifying potential challenges.
Create a cutting list with every piece labeled and dimensioned. I write directly on each board with a pencil to avoid mix-ups during assembly. Here’s my standard approach:
- Mark the best face of each board (the one that’ll be visible)
- Identify any defects to work around
- Plan cuts to minimize waste and maximize grain continuity
Double-check your space requirements. I learned this lesson when I built a gorgeous table that was six inches too long for the intended room. Measure your space, then measure your plans, then measure both again.
Phase 2: Breaking Down Lumber (45 minutes)
This is where many beginners get overwhelmed, but it’s straightforward if you work systematically. I always start with the longest pieces and work down to shorter components.
Safety first — and I’m not just saying that because I should. I’ve seen too many emergency room visits from rushed cuts. Sharp blades, proper support, and focused attention prevent 99% of workshop accidents.
Cutting sequence:
- Tabletop boards: Cut three 1x6 boards to 48" length
- Legs: Cut four 2x4 pieces to 17.25" (accounts for tabletop thickness)
- Long aprons: Cut two 2x4 pieces to 42"
- Short aprons: Cut two 2x4 pieces to 12"
- Center support: Cut one 2x4 to 38"
Pro tip I wish someone had told me: Cut everything about 1/16" longer than the final dimension, then trim to exact length with a miter saw or sander. This accounts for slight variations in measuring and gives you perfect, square ends.
Phase 3: Surface Preparation (90 minutes)
This is where patience pays enormous dividends. Every hour you spend on proper sanding saves you hours of frustration during finishing.
Start with 120-grit sandpaper on all surfaces that will be visible. Sand with the grain, never against it, and overlap your passes by about half the sander’s width. I use a random orbital sander for flat surfaces and hand-sand any curved or detailed areas.
Progress through grits systematically: 120, then 150, then 220. Don’t skip grits — it’s tempting when you’re eager to see progress, but each grit removes the scratches from the previous one. Skipping from 120 to 220 leaves visible scratch marks that show through any finish.
Check your work with a bright light raked across the surface at a low angle. This reveals any missed scratches or dents that need attention.
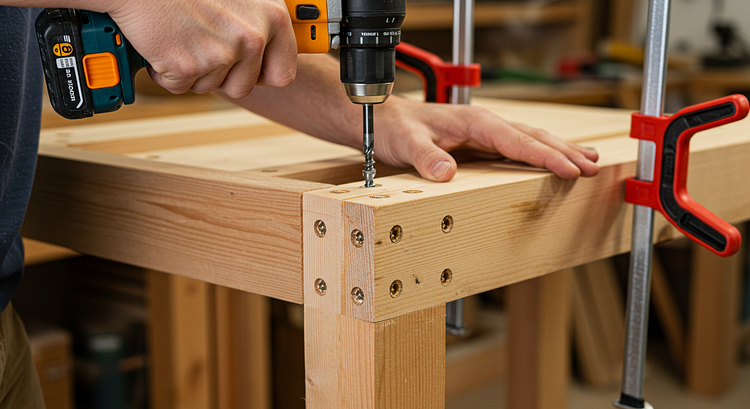
Phase 4: Joinery and Assembly (2 hours)
The farmhouse design uses pocket screw joinery, which creates strong connections while remaining completely hidden. If you don’t own a pocket hole jig, this project justifies the investment.
Drill pocket holes in the apron pieces — two holes on each end of the long aprons, positioned on the inside faces where they won’t be visible. The angle and depth matter, so follow your jig’s instructions carefully.
Dry-fit everything before applying glue. This seems obvious, but I can’t count how many times I’ve seen builders skip this step and end up with misaligned joints or pieces that don’t quite fit. Dry-fitting reveals problems that you can still fix easily.
Assembly sequence matters. I always start by connecting the short aprons to two legs, creating the end assemblies. Then connect these with the long aprons to form the base. The center support goes in last, providing additional stability for the tabletop attachment.
Use clamps strategically to maintain square and tight joints while the screws draw everything together. I check diagonal measurements after each major assembly step — if they’re equal, your frame is square.
Phase 5: Tabletop Construction (90 minutes)
The tabletop is where your coffee table’s personality emerges. Small details here make the difference between amateur and professional results.
Edge-join the three 1x6 boards to create the 48" x 18" top. Apply a thin, even bead of wood glue to the joining edges, then clamp with bar clamps every 12–16 inches. The key is even pressure — too much force can weaken the joint by squeezing out all the glue.
Alternate clamp directions (over and under the boards) to prevent bowing. This technique took me several failed glue-ups to learn, but it’s crucial for flat tops.
Allow proper cure time — at least 30 minutes before removing clamps, preferably an hour. I know it’s tempting to rush this step, especially when you’re excited to see the finished piece, but patience here prevents joint failures later.
Phase 6: Final Assembly and Attachment (45 minutes)
Center the base on the underside of the tabletop and mark screw locations. I use a combination of measurements and visual alignment to get this perfect — the base should look centered from every angle.
Pre-drill screw holes to prevent splitting, especially near board ends. Use screws long enough to bite well into the apron (at least 1.5" of penetration) but not so long they come through the tabletop surface.
Test the table’s stability before moving on to finishing. A properly built coffee table shouldn’t rock or wobble on a flat surface. Minor adjustments now save major headaches later.
Advanced Joinery Techniques
Once you’ve mastered the basic pocket screw construction, these traditional joinery methods will elevate your coffee tables from functional furniture to heirloom pieces. I didn’t attempt these techniques until my fourth or fifth build, but they’re worth the learning curve.
Mortise and Tenon Joints
This centuries-old connection method creates incredibly strong joints without any metal fasteners. I use mortise and tenon joints primarily for connecting aprons to legs in higher-end builds.
The mortise (rectangular hole) goes in the leg, while the tenon (matching projection) is cut on the apron end. The fit should be snug but not require excessive force — what woodworkers call a “hand-tight” fit.
Cutting mortises by hand requires a sharp chisel and patience, but the results are incredibly satisfying. I start by drilling out most of the waste material with a drill bit slightly smaller than the mortise width, then clean up the walls with a chisel.
Tenon cutting is easier than most beginners expect. A sharp hand saw and careful marking produce excellent results, though a table saw with a dado blade speeds the process considerably.
Dovetail Joints for Drawers
If you’re building a storage coffee table with drawers, dovetail joints showcase true craftsmanship while providing unmatched durability. I’ll be honest — my first attempts were pretty rough, but even imperfect dovetails are stronger than most mechanical fasteners.
Start with half-blind dovetails for drawer fronts, where the joint is only visible from inside the drawer. This hides small imperfections while you develop your technique.
Hand-cutting dovetails connects you to generations of furniture makers, but dovetail jigs produce consistent results much faster. I own both hand tools and a jig, using each depending on the project’s requirements and my available time.
Breadboard Ends
For tabletops wider than 24 inches, breadboard ends help control wood movement while adding visual interest. These perpendicular pieces at each end of the tabletop require careful joinery to accommodate seasonal expansion and contraction.
The challenge is allowing the main tabletop boards to move while keeping the breadboard ends securely attached. Traditional solutions involve elongated mortises and specially designed fasteners that slide as the wood moves.
Modern approaches use figure-8 fasteners or slotted holes that achieve the same movement accommodation with less complex joinery. I prefer the traditional method for its historical authenticity, but practical considerations sometimes favor modern hardware.
Finishing Touches That Make the Difference
The finish you choose dramatically affects both the appearance and durability of your coffee table. I’ve experimented with dozens of different finishing products and techniques, learning that the right finish for your specific situation depends on several factors.
Understanding Wood Finishes
Penetrating finishes like oil and stain soak into the wood fibers, enhancing grain patterns while providing minimal surface protection. These finishes feel natural to the touch but require more frequent maintenance.
Surface finishes like polyurethane and lacquer form a protective layer on top of the wood. They offer superior protection against spills and wear, but can feel less natural and may yellow over time.
My go-to combination for coffee tables is a penetrating stain followed by multiple coats of water-based polyurethane. This approach enhances the wood’s natural beauty while providing practical protection for daily use.
Application Techniques That Work
Surface preparation is everything. I spend as much time preparing to finish as I do applying it. Every scratch, dent, or sanding mark shows through the finish, so final sanding with 220-grit paper is non-negotiable.
Dust control makes an enormous difference in the final appearance. I tack cloth all surfaces immediately before applying a finish, work in a clean environment, and maintain proper humidity levels to minimize dust settling in the wet finish.
Thin coats build better than thick ones. I’d rather apply four thin coats of polyurethane than two thick ones. Thin coats level better, cure more completely, and create less texture from brush marks.
Between-coat sanding with 320-grit paper removes any raised grain or surface imperfections. This step transforms a good finish into a professional-quality result.
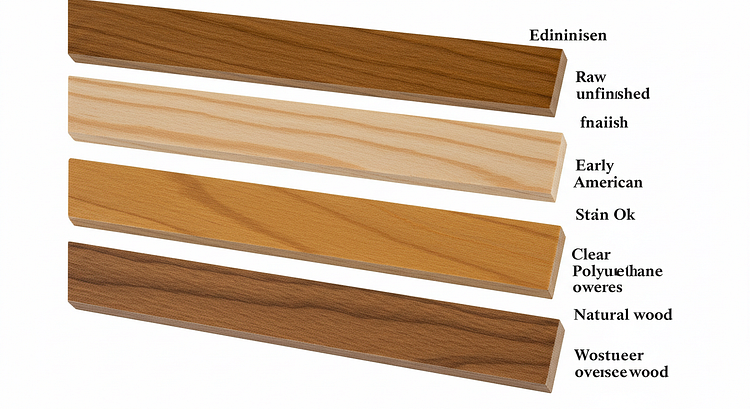
My Favorite Finish Combinations
For Pine Coffee Tables: Early American stain followed by three coats of semi-gloss polyurethane creates a warm, traditional appearance that complements most home decor. The slight amber tone in the stain enhances the pine’s natural variation.
For Oak Projects: I often use no stain at all, letting oak’s natural grain take center stage under a clear satin finish. When clients want color, Golden Oak or Honey stain enhances the natural tones without overpowering the grain.
For Modern Designs: Water-based finishes maintain the wood’s natural color while providing excellent protection. I prefer satin sheens for their subtle elegance — they hide fingerprints better than gloss while still reflecting enough light to highlight the wood’s character.
Common Mistakes (And How to Avoid Them)
Every mistake I’ve made (and I’ve made plenty) has taught me something valuable about woodworking. Here are the most common issues I see in beginner coffee table builds, along with proven solutions.
Measurement and Planning Errors
The most expensive mistake I ever made was cutting all my apron pieces 2 inches too short because I misread my own plans. Always double-check measurements, and when in doubt, cut long and trim to fit.
Room measurement oversights happen more often than you’d think. I measure the intended space multiple times and make a cardboard template for large pieces. What looks right on paper doesn’t always work in the actual room.
Wood movement calculations often get overlooked until seasonal changes cause problems. In most climates, wide tabletops need accommodation for expansion and contraction, typically about 1/4 inch per 12 inches of width.
Joinery Problems
Weak pocket screw joints usually result from incorrect drilling angles or inadequate pilot holes. I always test my pocket hole setup on scrap wood before drilling actual project pieces.
Glue squeeze-out seems minor during assembly but becomes a major finishing problem. I’ve learned to apply just enough glue for strength without excess, and I always keep a damp cloth nearby for immediate cleanup.
Misaligned joints create wobbly furniture that’s impossible to fix after assembly. Dry-fitting everything reveals problems while they’re still correctable.
Finishing Disasters
Blotchy stain application on softwoods like pine can ruin an otherwise perfect project. I always use pre-stain conditioner on pine and other resinous woods to ensure even color absorption.
Brush marks in polyurethane were my nemesis for years until I learned proper application techniques. High-quality brushes, proper thinning, and careful application eliminate most texture issues.
Dust in the finish happens to everyone, but proper preparation minimizes it. I vacuum the workshop, tack cloth all surfaces, and apply finish during calm weather when possible.
Assembly Challenges
Clamping problems cause more project failures than most people realize. I invest in quality clamps and learn proper clamping techniques — even pressure, protective pads, and regular monitoring during cure time.
Rushed assembly leads to misalignment and poor joints. I organize all materials, tools, and clamps before mixing any glue, then work systematically through the assembly sequence.
Design Comparison: Which Style Fits Your Space?
Choosing the right coffee table style involves balancing personal preferences with practical considerations. I’ve built tables for tiny apartments and grand living rooms, learning that the best design serves both aesthetic and functional needs.

Space Considerations
Small apartments benefit from storage-integrated designs or minimalist styles that don’t overwhelm the room. I always recommend measuring not just floor space but also visual weight — how much attention the piece draws in the overall room composition.
Large living rooms can accommodate substantial farmhouse or live edge designs that make bold statements. These spaces often benefit from coffee tables that anchor seating arrangements and provide visual weight proportional to the room size.
Multi-use spaces like studio apartments need coffee tables that adapt to different functions. Adjustable height mechanisms, hidden storage, and easily movable designs serve changing needs throughout the day.
Lifestyle Matching
Families with young children need durable finishes and rounded edges. I often recommend painted finishes over natural wood for these situations — they hide damage better and can be easily refreshed.
Entertainers benefit from larger surfaces and stable designs that won’t tip when loaded with drinks and snacks. Lower profiles work better for conversation groupings.
Minimalists prefer clean lines and hidden storage that maintains visual simplicity while providing practical function.
Troubleshooting Your Build
Even experienced woodworkers encounter unexpected challenges during builds. Here’s how I diagnose and fix the most common coffee table construction problems.
Structural Issues
Wobbly legs usually indicate measurement errors or joinery problems. I check diagonal measurements first — if they’re unequal, the frame isn’t square and needs adjustment before proceeding.
Sagging tabletops result from insufficient support or inadequate material thickness. Adding a center beam or upgrading to thicker material solves most sagging issues.
Joint failures during or after construction typically indicate insufficient glue coverage, contaminated surfaces, or premature stress on uncured joints. Prevention is easier than repair — I always allow full cure time before removing clamps or applying stress.
Surface Problems
Tear-out during sanding happens when moving against the grain or using too aggressive grit progression. Start with finer grits and work systematically through the sequence.
Raised grain after staining is normal with water-based products, but can be minimized with proper surface preparation. Light sanding with 320-grit paper between coats eliminates most texture issues.
Color variations in stained pieces often result from inconsistent surface preparation or application technique. Uniform sanding patterns and consistent stain application prevent most color problems.
Fit and Function Issues
Drawers that stick usually need adjustment in the slides or slight material removal. I always build drawers slightly undersized and gradually expand the fit through careful sanding.
Doors that won’t close properly indicate hinge placement issues or frame distortion. Careful measurement and adjustment during installation prevent most alignment problems.
Uneven surfaces on tabletops require flattening with a hand plane or power planer. This is easier to prevent than fix — careful material selection and proper glue-up techniques avoid most surface irregularities.
Maintenance and Long-term Care
A well-built wooden coffee table should serve your family for generations with proper care. I’ve maintained tables I built over a decade ago, learning what practices preserve both beauty and function over time.
Daily Care Routines
Coaster discipline prevents most water damage and staining. I provide attractive coasters with every table I build and educate clients about their importance. Water rings are much easier to prevent than to remove.
Regular dusting with microfiber cloths maintains the finish and prevents abrasive particle buildup. I avoid furniture polishes that contain silicone — they make future refinishing much more difficult.
Immediate spill cleanup prevents stains and finish damage. Most finishes provide several minutes of protection, but prompt attention prevents permanent damage.
Seasonal Maintenance
Humidity control prevents most wood movement problems. I recommend maintaining 30–50% relative humidity year-round to minimize expansion and contraction cycles.
Annual inspection catches small problems before they become major issues. I check all joints, hardware, and finish conditions during seasonal cleaning.
Finish refresh every 2–3 years, maintain protection and appearance. This might involve simple cleaning and waxing or complete refinishing, depending on use patterns and wear.
Long-term Preservation
Refinishing techniques I use depend on the original finish and current condition. Sometimes, simple screening and recoating suffice, while other situations require complete finish removal and reapplication.
Structural repairs become necessary over decades of use. Loose joints can often be re-glued, while more extensive damage might require partial reconstruction.
Value appreciation of handmade furniture increases over time, especially pieces built with quality materials and traditional techniques. Proper maintenance preserves both function and investment value.
Building your wooden coffee table connects you to a tradition of craftsmanship while creating something uniquely yours. The skills you develop, the satisfaction of completion, and the daily pleasure of using something you built with your own hands make every minute invested worthwhile.
Start with simple designs and quality materials. Take your time with each step. Learn from mistakes rather than being discouraged by them. Most importantly, enjoy the process — the journey of creating is just as valuable as the destination.
Your living room is waiting for that perfect coffee table, the one that fits exactly right and tells your story. Now you have everything you need to build it.
Recommended Resources
After years of trial and error, I’ve found three resources that consistently help DIY furniture builders achieve professional results:
“The Complete Book of Woodworking” by Tom Carpenter — This comprehensive guide covers every technique I use in coffee table construction, from basic cuts to advanced joinery. I reference specific chapters before starting each new project type. The step-by-step photography makes complex concepts accessible to beginners while providing depth for advanced builders. Personal note: This book sits permanently on my workshop bench — it’s that valuable.
“Weekend Woodworker” Online Course — Perfect for beginners who want structured learning with video instruction. Steve teaches the fundamental skills needed for furniture building through five complete projects, including a coffee table very similar to my farmhouse design. The community forum provides ongoing support and troubleshooting help. I recommend this course to every beginner who asks about getting started.
Festool Domino Joiner DF 500 — While not essential for beginners, this tool revolutionized my furniture building when I could finally justify the investment. It creates incredibly strong joints faster than traditional mortise and tenon work while maintaining the structural integrity that makes heirloom furniture possible. I waited three years to buy this tool, but it immediately elevated the quality and speed of my builds.
Transparency Note: This article contains affiliate links for products I personally use and recommend. If you purchase through these links, I may earn a small commission at no additional cost to you. This helps support the creation of detailed content like this guide. I only recommend products I’ve personally tested and believe provide genuine value.


0 Comments